Pre-requisites
This is a tutorial intended for programmers already comfortable with Objective-C and Cocoa. Interface Builder is to my knowledge unique in its approach, and often makes it hard to understand an existing code-base. This tutorial will focus on translating stuff you do in Interface Builder to the runtime consequences.
Though it might seem these are unrelated, without a thorough understanding of the following, Interface Builder will stay somewhat obscure:
-
Cocoa Event-Handling in particular the First Responder concept
-
object graph serialisation (and the theory) and the NSCoding protocol
Definitions
Ok first off, links with the little cameras are screenshots, you are expected to click to know what’s going on. They look like this: Screen shot
Also, Nib and Xib are the same thing. Xib is an XML-based new replacement for the Nib format (which was binary and tough on version control), I use them interchangeably. The classes use the Nib name, but the filenames they load can use either extension.
I will use the prefix IBEX (Interface Builder Example) for my example classes (IBEXClassA and IBEXClock), that might not have been the best choice of prefix, agreed.
What Interface-Builder is
An editor of nib/xib files, which contains instances of objects, which can be connected to each other, thus creating an object graph.
A UI is an object-graph: it is an instance of text field, whose parent is an instance of a window, and a list connected to a datasource.
Interface Builder is a convenient way to build such object graphs. If they happen to be UIs, then Interface Builder can help you even further by showing previews of the UI. Let me emphasise this point: Interface Builder does not build User Interfaces, it builds object graphs, one sub-type of which are indeed UIs. Apple’s own new project templates create the application delegate in the xib and connect it to the NSApplication from there, which is plumbing more than it is UI.
What a xib file is
All the instances you are editing in IB write all their properties, and instances they are connected to. By connected to I mean simply to have a reference to. A connection can be a binding, but we’ll get back to that.
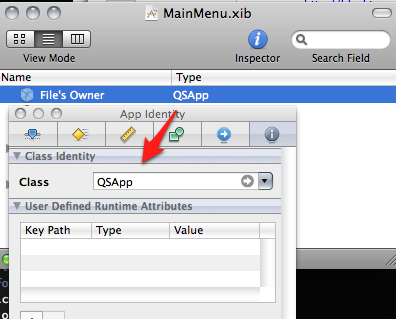
A xib file is loaded by with the NSNib class (with initWithNibNamed:bundle:), and the objects it describes can be instantiated as many times as desired (with instantiateNibWithOwner:topLevelObjects:). When you instantiate a xib file, you provide a reference to an “Owner object”. This should be the object that is between the contents of your xib and the rest of your application, so it is often an NSWindowController, but can really be anything. The instance you give here will be accessible in Interface Builder as the Files Owner. In fact, as you can see in the screen shot, Interface Builder doesn’t really know what you’ll give at runtime, which is why you tell it by setting the class of objects in the Identity inspector, so that Interface Builder then knows what properties and actions it can do.
Why “MainMenu” ? I’m so glad you asked. As you know, Mac OS X applications run independently from having any windows. What they do usually have one-of, is a main menu. This xib is the file that is conventionally used to describe that menu, and sometimes a few more objects are in there. It’s a good place to start investigating when discovering the source code of an application.
I mentioned before that containing a UI is only a secondary use of xib files. Many applications like to create classes more than they like instances. To keep a form of abstraction and inversion of control (I assume), they create those objects in Interface Builder, and connect them to their application that way, this means that you won’t understand a program fully without taking a look at the xib files, as they can describe the interactions between classes.
File's Owner
The Files Owner object that is available in Interface Builder (you can bind and connect to it), is an object that is not actually created in the nib. In fact, it represents an instance that is given to NSNib when you instantiate it. By default, this will be either the NSApplication instance, or the NSWindowController.
Creating objects
The code
The object we are creating is lovingly called IBEXClassA. The header is a normal objective-c header file, with the following twists:
- fields or properties we want to assign values to from interface builder are prefixed with the
IBOutletdefine (which is just deleted by the C pre-processor) - selectors that we want to call from objects we create in interface builder, which always have 1 parameter (the sender of type
id), have a return type ofIBAction(which the C pre-processor replaces byvoid)
Adding these defines means that Interface Builder will pick up on them and show them to the developer, nothing more. Sometimes, it needs a little refresh and offer to connect to them, you can do that using the File menu’s Read classes functions.
Here is the definition of my example object:
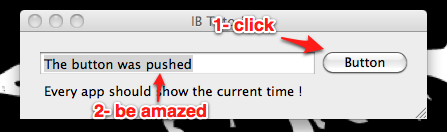
@interface IBEXClassA : NSObject {
  IBOutlet NSTextField *some_nstextfield_;
}
- (IBAction)pushTheButton:(id)sender;
@end

@implementation IBEXClassA
- (void)awakeFromNib {
  NSRunAlertPanel(@"Awoke!", @"awakeFromNib is running", @"Ok", nil, nil);
}

- (IBAction)pushTheButton:(id)sender {
  [some_nstextfield_ setStringValue:@"The button was pushed"];
}
@end
The instance in Interface Builder
Now we will create a new instance of the object. This means that our class will be instantiated when the xib is instantiated.
Please note that init will not necessarily be called. Usually initWithCoder: is the one called, but at that point, the references to other objects might not be setup yet.
To act when your object is ready to go, implement awakeFromNib.
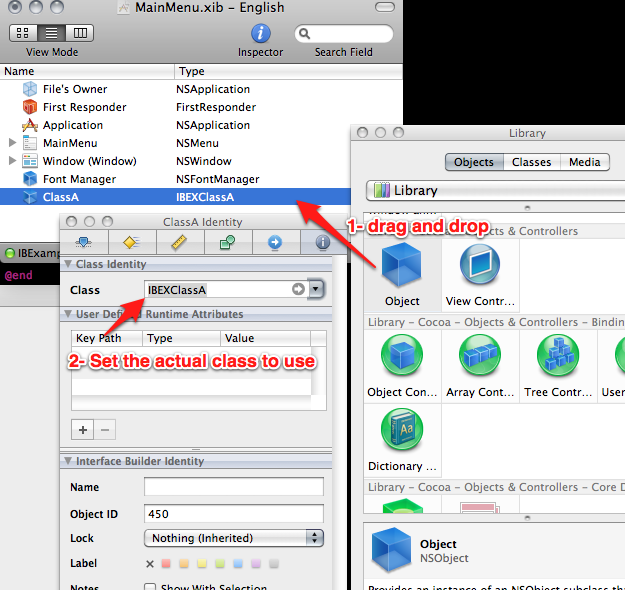
Ok, so Create the object. If you look in the Connections Inspector, you’ll find Interface Builder picked up on the IBAction and IBOutlet we defined in the class.
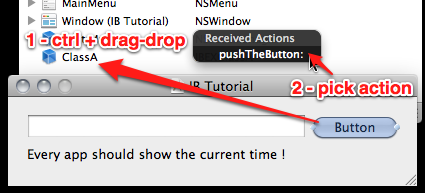
Setup the Window layout and Connect the button to the action. You can now see our class is connected to the button in the Buttons connections
We want our text field available to our class, so Connecting the text field (and pick some_nstextfield_).
That’s it. You now have a running application. Try it, Run the application.
The full story
How does it work then ? I’d like to connect a few dots (this is by no means an exhaustive listing of all the magic).
Overall application life-cycle
-
At application launch, the runtime starts the
int main(int argc, char *argv[])function (usually in yourmain.mfile) -
That calls
NSApplicationMain()which:- 1 - Creates an
NSApplicationinstance (and/or yourNSPrincipalClass) - 2 - Instantiates the xib file specified in the
Info.plistfile, under theNSMainNibFilekey, which is set toMainMenuby the X-Code new application template. - 3 - The cocoa framework then loops in its runloop, dispatching events.
- 1 - Creates an
xib file loading
In step 2, the xib we have been editing in Interface Builder, which is an application resource, is located (by adding the nib or xib extensions), and the file is then unarchived (with some further magic for localisations).
-
An instance of every object is initialised. One window, one button, one text field, one of our IBEXClassA are all setup into live objects in memory
-
Then the instances are connected together:
- So the button’s target is now our instance of IBEXClassA, and it’s selector is
pushTheButton:, - The field
some_nstextfield_of IBEXClassA is assigned the instance of theNSTextField - The button, field, label are set as sub-views of the window and all that UI stuff
- So the button’s target is now our instance of IBEXClassA, and it’s selector is
-
Every instance that was initialised by this process is sent an
awakeFromNib
At this point you might be wondering why there was that label. One explanation is that I was planning on doing something with it, and have changed my mind, but was too lazy to re-do the screenshots. Or I’m checking that you’re still paying attention.
Bindings
Interface Builder can also fully exploit the super-powers of Cocoa Bindings.
This can be very easily abused, and i think it's considered bad practise to use too much logic from within IB. I wouldn't recommend it anyway. I wouldn't be writing this if Interface Builder was obvious.
Starting from scratch.
Let’s use the following code now, and note that we will not be using IBOutlets or IBActions this time:
@interface IBEXClock : NSObject {
  NSTimer *refreshTimer_;
}
@property (readonly) NSString *currentTime;
@property (assign, nonatomic) BOOL active;
@end

@implementation IBEXClock
- (NSString *)currentTime {
  return self.active ? [[NSDate date] description] : @"Blinking 00:00";
}
- (void)refreshTime:(NSTimer*)theTimer {
  [self willChangeValueForKey:@"currentTime"];
  [self didChangeValueForKey:@"currentTime"];
}
- (BOOL)active {
  return !!refreshTimer_;
}
- (void)setActive:(BOOL)active {
  if ((!!refreshTimer_) == !!active) return;
  [self willChangeValueForKey:@"currentTime"];
  [self willChangeValueForKey:@"active"];
  if (active) {
    refreshTimer_ = [NSTimer scheduledTimerWithTimeInterval:0.1
                                                     target:self selector:@selector(refreshTime:)
                                                   userInfo:nil
                                                    repeats:YES];
  } else {
    [refreshTimer_ invalidate];
    refreshTimer_ = nil;
  }
  [self didChangeValueForKey:@"active"];
  [self didChangeValueForKey:@"currentTime"];
}
@end
Now go to interface builder, and duplicate this Setup of the Xib for bindings. You should have created:
- One IBEXClock instance
- One label, and one checkbox
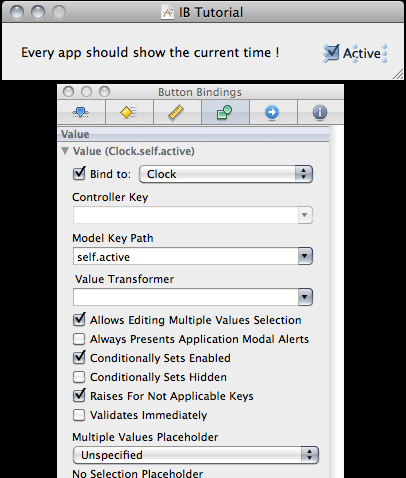
We can then add the bindings, which come in three parts. So add a binding for the label's value and a binding for the checkbox's value.
- You bind to the instance IBEXClock we created before
- When self is that instance, the key path we bind to is
self.activeorself.currentTime.
You can now run the application and it will behave as expected, a clock with an on/off switch.
- When you check the “Active” checkbox, it sets it value to true, which is bound to the clock’s active property, which in turn, is set to true.
- The clock starts the timer, and uses
willChangeValueForKey:anddidChangeValueForKey:to stay KVO compliant - When the timer fires, it also flags
currentTimeas having changed - The binding system observes that, that and updates everything it needs.
- The label’s value keeps reflecting the status and time of the clock.
I have been asked why I include this section, and before getting hopes up, let me clarify: I cannot go in detail about how the NSArrayController works here, it would be way too long (there is more information however in the Further Reader section). But I do hope that including this here will help explain what the NSArrayController does in broad strokes. It’s role if you will.
The NSArrayController is quite simply a KVO compliant object that maintains an array and things that you’d like to have when navigating/editing that array with a UI.
Things that you want when presenting a list to the user include:
-
An ordered list of all objects (
arrangedObjects) -
A selection (
selectionorselectedObjects) -
Some IBActions to navigate the selection (
selectNext:,selectPrevious:) -
A boolean that’s true when there’s something selected (so you can enable a delete button for example:
canRemove) -
Some editing, filtering, sorting helpers…
Licence and Copyright
'twas written by Eric Doughty-Papassideris

This work is licensed under a
Creative Commons Attribution 3.0 Unported License
.
Disclaimer
You're getting this for free, and it comes with no garantees whatsoever. It comes as-is. I don't want to know about what happened (or not) because of this code. You are getting it "as-is", and it "is not my problem".
I’m not very good with legal, but it seems I have to mention this for ass-covering: Interface Builder, Cocoa, Mac OS X, X-Code, and more are Copyright 1999-2010 Apple Inc, and Trademarks, and Brands, and perhaps more, and this is not legal advice.